Jeroen's Project Journals
Introduction
2023-12-16
Even before I started building the concrete subwoofer, I realized I didn’t have the audio gear to properly hook it up. For my PC I have a SMSL Q5 Pro DAC/Amplifier, which does have a subwoofer line-out but does not handle cross-over or any other kind of DSP. So I decided to do what every self-respecting maker would: build it myself. The result is this 4-channel USB DAC with DSP capabilities.
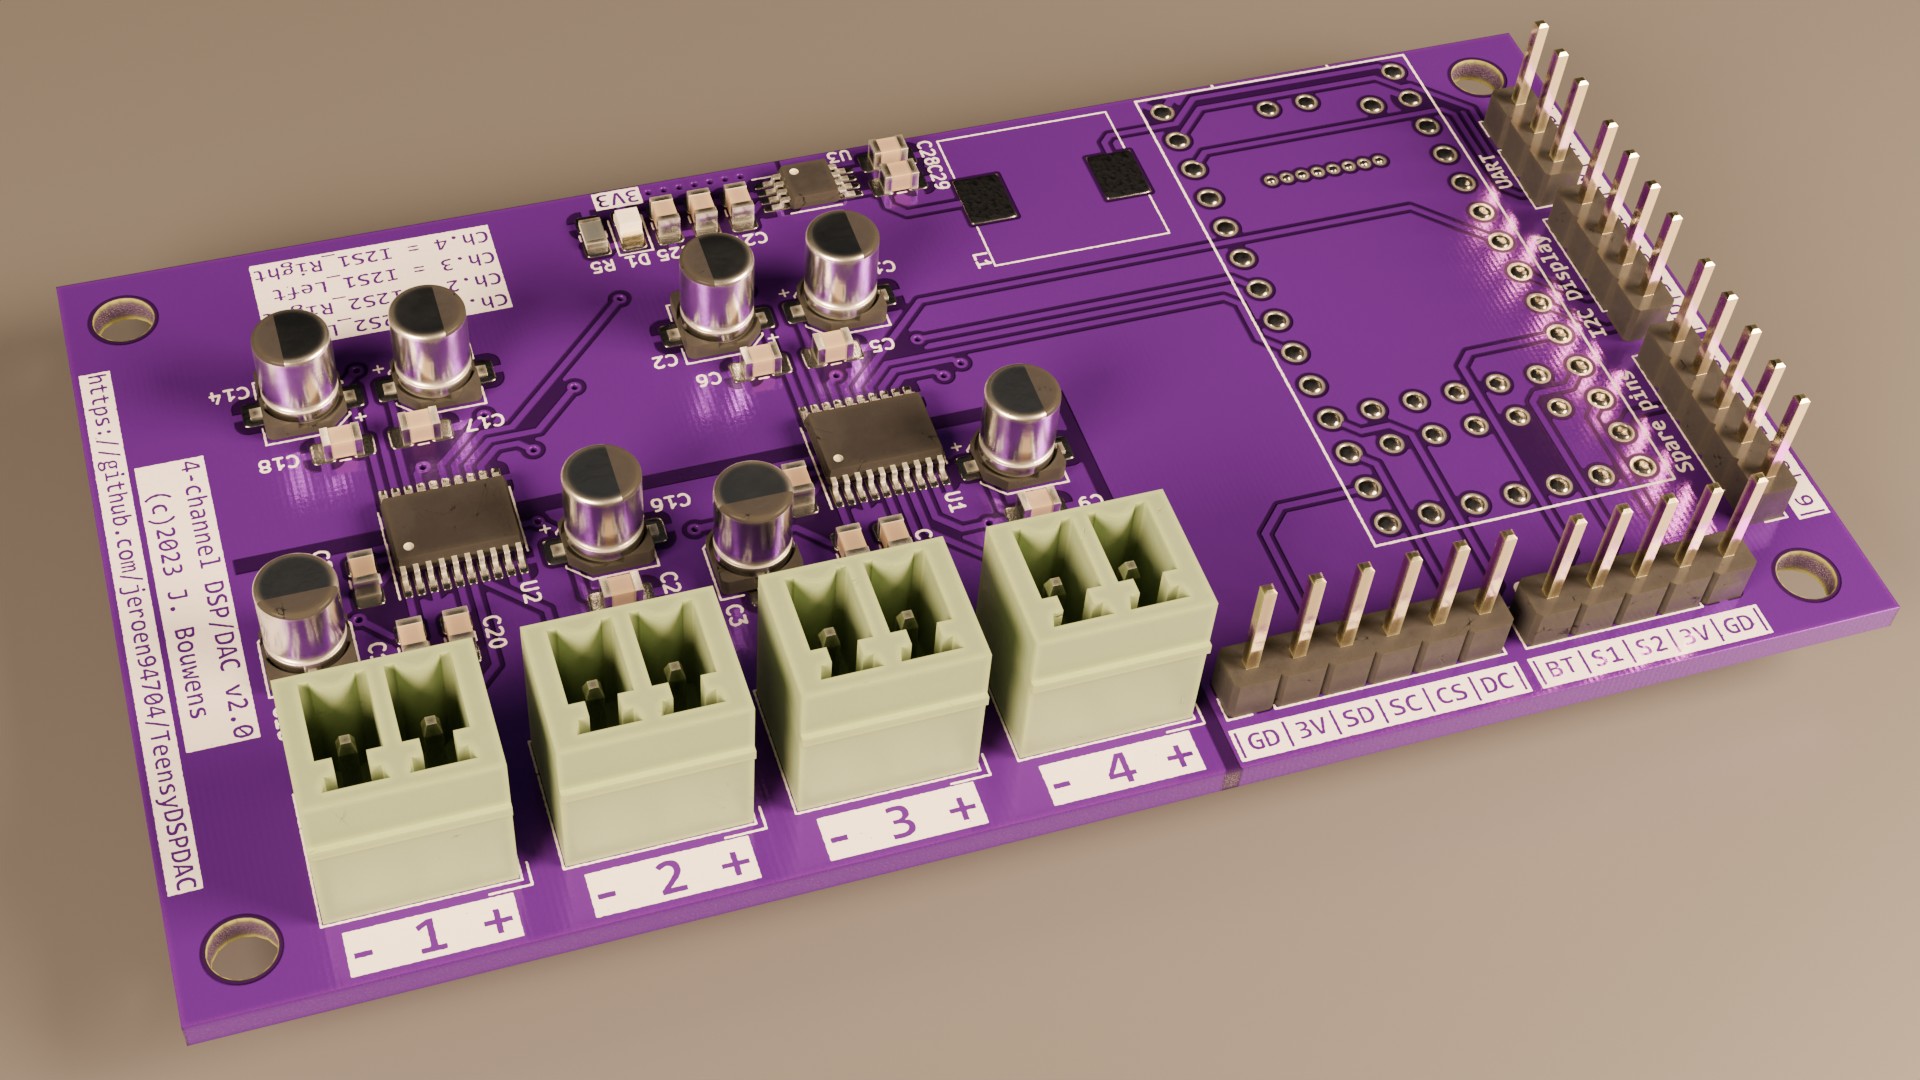
The project centers around a custom PCB with TI PCM5102A DAC chips, a place to plug in a Teensy 4.0 and connectors to hook up a display and rotary encoder knob. The software running on the Teensy performs the DSP and handles user interaction. The device is mounted inside a 3D printed enclosure. Since I’m not an electronics engineer this design is based on the reference circuits in the respective components’ datasheets.
The Teensy’s UART, SPI0 and I2C0 ports are available through dedicated pin-headers. By default the Teensy software uses an SPI dispay, but if needed an I2C OLED display module can be used instead. The remaining unused Teensy pins are broken out on a pair of pin-headers on both sides of the board.
Programming the DSP
DSP functionality can be designed using PJRC’s Audio System Design Tool. Initially I wanted to use Chip Audette’s OpenAudio F32 Design Tool, but that library does not support the I2S2 output, which my board needs. The code generated by either of these tools is not a complete Arduino Sketch, but a set of variable declarations that you can copy-paste into an existing sketch. For example, below is a design of a DSP for a 2.1 speaker setup. It takes a USB stereo input signal and creates a separate subwoofer channel with just the low frequencies:

This design results in the following code:
#include <Audio.h>
#include <Wire.h>
#include <SPI.h>
#include <SD.h>
#include <SerialFlash.h>

// GUItool: begin automatically generated code
AudioInputUSB            usb1;           //xy=167.1666717529297,283.1666564941406
AudioFilterStateVariable filter2;        //xy=403.16668701171875,341.16668701171875
AudioFilterStateVariable filter1;        //xy=407.16668701171875,218.16665649414062
AudioMixer4              mixer1;         //xy=569.1666870117188,284.1666564941406
AudioOutputI2S2          i2s2_1;         //xy=718.1666870117188,347.16668701171875
AudioOutputI2S           i2s1;           //xy=721.1666870117188,231.16665649414062
AudioConnection          patchCord1(usb1, 0, filter1, 0);
AudioConnection          patchCord2(usb1, 1, filter2, 1);
AudioConnection          patchCord3(filter2, 0, mixer1, 1);
AudioConnection          patchCord4(filter2, 2, i2s2_1, 0);
AudioConnection          patchCord5(filter1, 0, mixer1, 0);
AudioConnection          patchCord6(filter1, 2, i2s1, 0);
AudioConnection          patchCord7(mixer1, 0, i2s1, 1);
// GUItool: end automatically generated code
Programming the Teensy
The code generated by the Design Tool can be pasted into an existing Arduino sketch after downloading and installing Teensyduino. The variable declarations are enough to start the DSP process, so if all you want is audio then the only things you need to add are a call to AudioMemory, unmuting the DAC’s in setup() and handling the volume set on the host in the loop() function. So given the above code, the complete sketch could be as simple as:
#include <Audio.h>
#include <Wire.h>
#include <SPI.h>
#include <SD.h>
#include <SerialFlash.h>

// GUItool: begin automatically generated code
AudioInputUSB            usb1;           //xy=207.10000610351562,168
AudioAmplifier           amp2;           //xy=396.1000061035156,220.10000610351562
AudioAmplifier           amp1;           //xy=398.1000061035156,99.0999984741211
AudioFilterStateVariable filter2;        //xy=564.1000061035156,229
AudioFilterStateVariable filter1;        //xy=568.1000061035156,106
AudioMixer4              mixer1;         //xy=730.1000061035156,172
AudioOutputI2S2          i2s2_1;         //xy=886.0999755859375,235
AudioOutputI2S           i2s1;           //xy=887.0999755859375,116.99999237060547
AudioConnection          patchCord1(usb1, 0, amp1, 0);
AudioConnection          patchCord2(usb1, 1, amp2, 0);
AudioConnection          patchCord3(amp2, 0, filter2, 0);
AudioConnection          patchCord4(amp1, 0, filter1, 0);
AudioConnection          patchCord5(filter2, 0, mixer1, 1);
AudioConnection          patchCord6(filter2, 2, i2s2_1, 0);
AudioConnection          patchCord7(filter1, 0, mixer1, 0);
AudioConnection          patchCord8(filter1, 2, i2s1, 0);
AudioConnection          patchCord9(mixer1, 0, i2s1, 1);
// GUItool: end automatically generated code


void setup()
{
    // Allocate memory for the Audio connections
    AudioMemory(12);

    // Unmute the DAC's
    pinMode(PIND5, OUTPUT);
    digitalWrite(PIND5, HIGH);
}

float lastUSBVolume = 0.0;

void loop()
{
  // Handle the system volume set on the host device
  auto usbVolume = usb1.volume();
  if(usbVolume != lastUSBVolume)
  {
    amp1.gain(usbVolume);
    amp2.gain(usbVolume);

    lastUSBVolume = usbVolume;
  }

  delay(50);
}
If you want to add more functionality, such as controls (buttons, dials) or a display you can implement this in the same sketch.
Enclosure and Amplifier
The board has mounting holes for installation in an enclosure, but they are not placed to fit any particular model. If you use a metal enclosure make sure is is connected to the plated mounting holes (on the Teensy/USB-C port side of the board), which connects to the protective earth of the USB-C port.
For my own build I plan to create a custom, 3D-printed enclosure and I will add a link to that design once it’s done.
While it’s probably superfluous to mention this for most: The output of this board is a line-level signal, so you need to add an amplifier before you can hook up speakers. Which amplifier(s) to get is up to you and beyond the scope of this document. There are MANY 1-, 2- and 4-channel amplifiers to choose from, either in module-form (for integration into your own DSP+DAC+AMP) or standalone off-the-shelf.